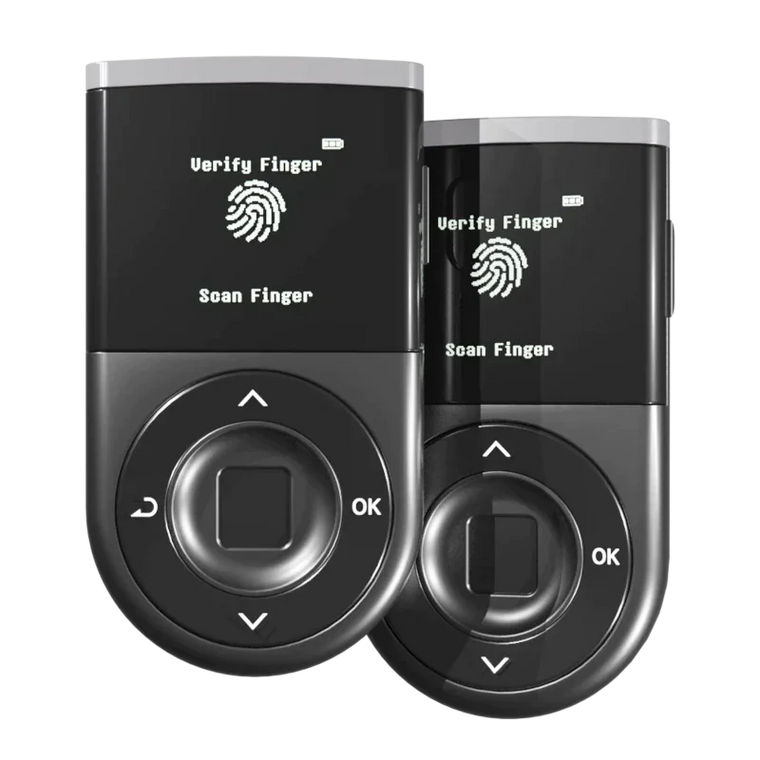







⚠️ Please read this before you start
Do not enter the recovery phrase (24-word mnemonic) of your current App Wallet into the "Recover Wallet" menu of a hardware wallet.
The recovery phrase is the wallet key itself. Any wallet created from the same recovery phrase uses the same key and the same addresses, no matter which device it runs on. If the phrase has been exposed, copying it into a hardware wallet does not protect your assets.
There are only two things to do.
- Select "Create Wallet" on the hardware wallet to generate a new recovery phrase.
- Send your assets to the newly created addresses.
Transfer, not recovery. Every step below follows this principle.
- To check if you need to take action, please refer to this article: [Notice] How to Check Whether the App Wallet Action Applies to You
Introduction
This guide explains how to move assets held in the DCENT App Wallet to a hardware wallet or an exchange. For the official notice and the latest updates, please refer to the official X post.
What is the App Wallet? It is the software wallet created inside the DCENT mobile app without a hardware device. Its wallet key is stored inside the app on your phone. If the wallet mode indicator at the top left of the DCENT mobile app shows "App Wallet", you are currently using the App Wallet. An App Wallet created from the same recovery phrase as a hardware wallet is also covered by this guide.
How to check whether an App Wallet has ever been set up. Tap the wallet mode button at the top left of the My Wallet tab to open the "Registered Wallets" list. If the list contains an "App Wallet" entry, an App Wallet has been set up on this phone. Even if you are currently using a hardware wallet mode, please check the assets in that App Wallet.


Caution. Never follow wallet addresses or DM instructions that come from anywhere other than official channels. DCENT never asks for your recovery phrase or asks you to send funds via DM.
1. Before You Start
1-1. Update the app and pause transactions
-
Update the DCENT app to the latest version. Both Android and iOS must be v10.0.0 or later.
- Android: Update on Google Play
- iOS: Update on the App Store
- Do not perform any transaction in the App Wallet before updating. This includes sending, swapping, and signing.
1-2. Decide where to move your assets
| Destination | Best for | Advantage | Good to know |
|---|---|---|---|
| A. DCENT hardware wallet | Users who have a device on hand | The wallet key stays inside the device's secure chip, separated from the app | Creating and backing up a new wallet takes 20–30 minutes |
| B. An exchange you already use | Users who do not have a hardware wallet | You can move assets right away with an existing account | The exchange holds the assets on your behalf |
If you do not have a hardware wallet, move to B. What matters now is getting your assets out of the App Wallet.
1-3. Differences between DCENT hardware wallets
| Product | Connection | Screen | Where the new wallet is created |
|---|---|---|---|
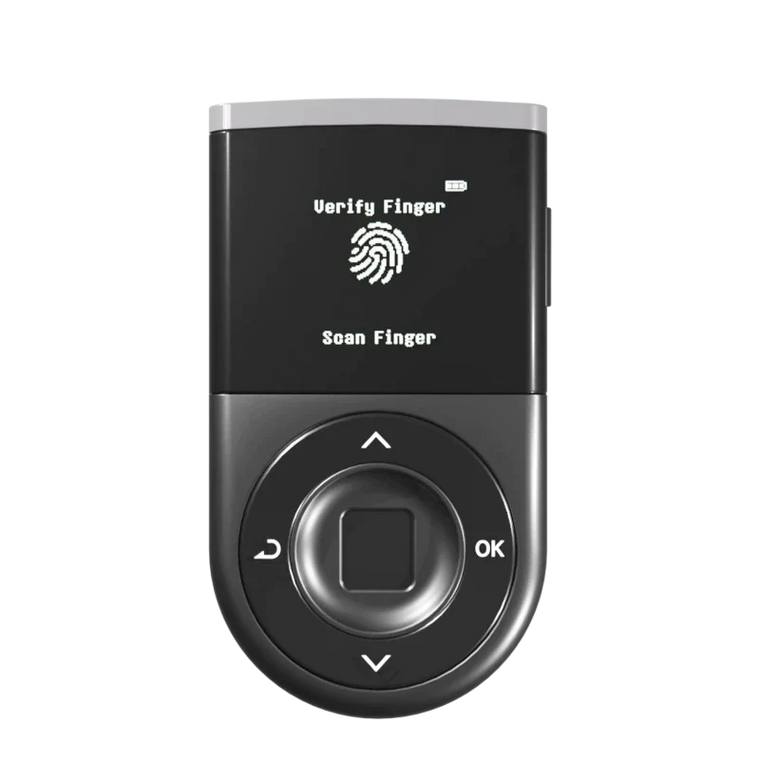
| Biometric Wallet | Bluetooth (USB OTG also available on Android) | Yes | On the device screen |
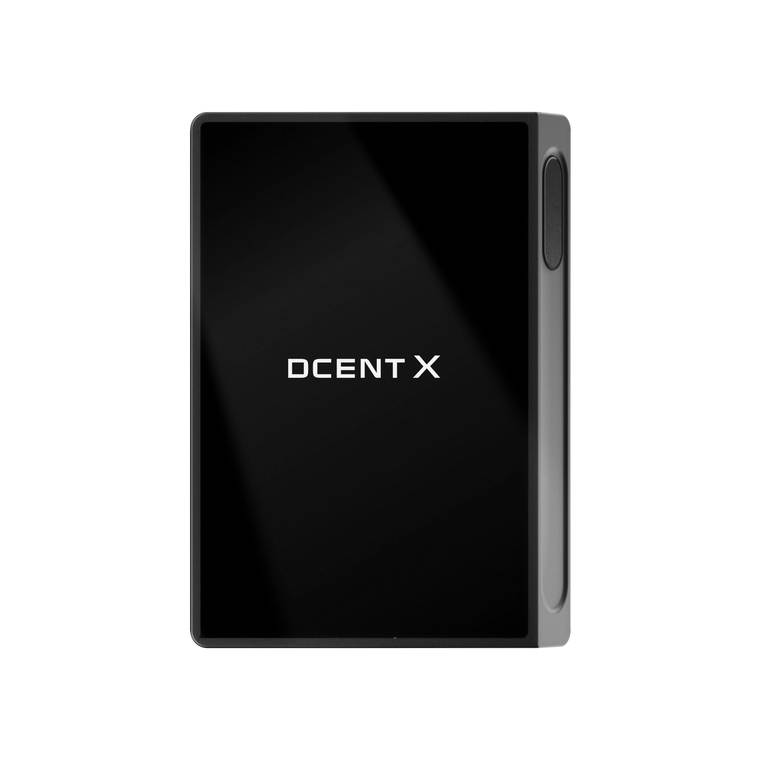
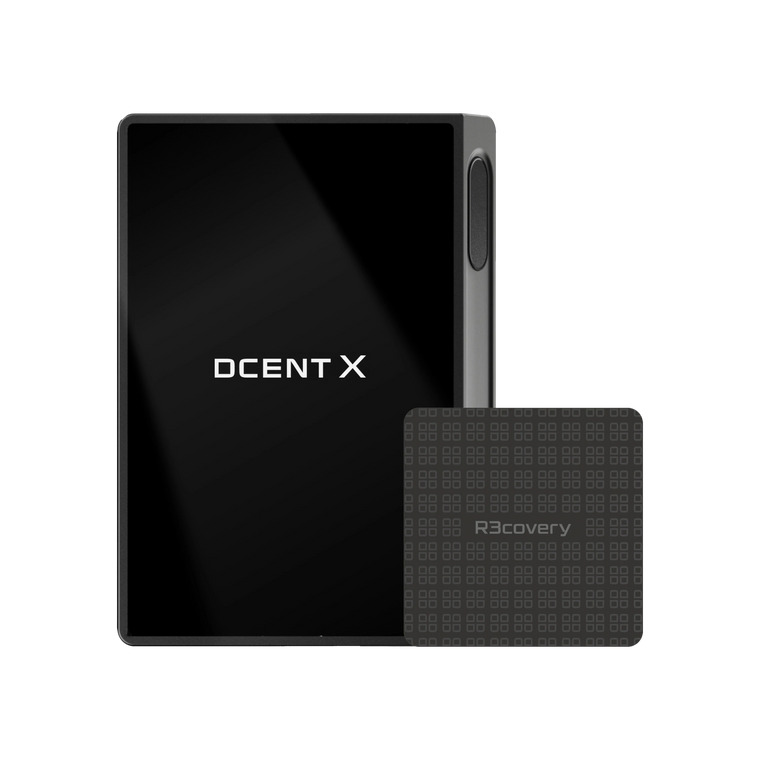
| DCENT X | Bluetooth | Touchscreen | On the device screen |
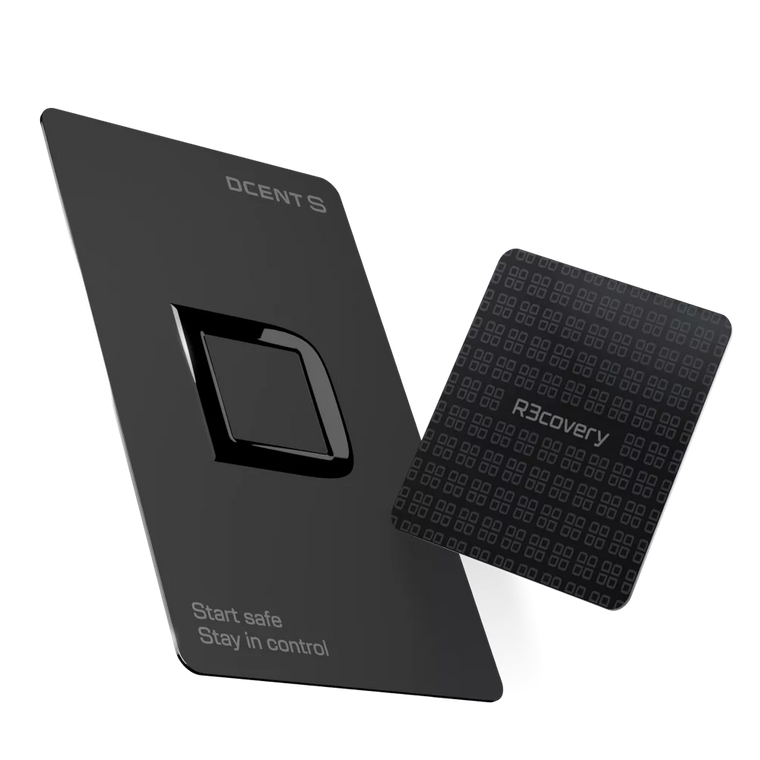
| DCENT S Card | NFC tap | No | In the DCENT app |
| All-in-One Card Wallet | NFC tap | No | In the DCENT app |
Caution. The All-in-One Card Wallet supports Ethereum-compatible (EVM) networks only. XRP, TRON, Bitcoin, Litecoin, VeChain, and Solana cannot be received on the All-in-One Card Wallet. Move those assets to the Biometric Wallet, DCENT X, DCENT S Card, or an exchange.
DCENT X, DCENT S Card, and the Biometric Wallet support the same list of networks as the App Wallet.
1-4. What to prepare
- Get your hardware wallet ready.
- Biometric Wallet, DCENT X: charge the device.
- DCENT S Card, All-in-One Card Wallet: turn on NFC on your phone.
- Prepare something to write the recovery phrase (mnemonic) on. The recovery card and a pen from the product box are enough. If you have a Recovery Card (R3covery Card), you can use it as well.
- Check that you have the coin needed for network fees in the App Wallet. If you only hold tokens and no fee coin, the transfer cannot be sent.
| Asset to move | Coin required for fees |
|---|---|
| Ethereum, ERC-20 tokens (USDT, USDC, etc.) | ETH |
| Polygon coin and tokens | POL |
| BNB Chain coin and tokens | BNB |
| Kaia coin and tokens | KAIA |
| TRON coin, TRC-20 tokens (USDT, etc.) | TRX |
| VeChain (VET) | VTHO |
| Bitcoin | BTC (deducted from the same balance) |
| Litecoin | LTC (deducted from the same balance) |
| XRP | XRP (deducted from the same balance) |
- Allow enough time. Including a small test transfer and confirmation, expect at least 10 minutes per asset type.
2-A. Moving to a Hardware Wallet
Step 1. Create a new wallet on the hardware wallet
Caution. On the initial setup screen, do not select any menu such as "Recover Wallet", "Restore", or "Import existing wallet". Always select "Create Wallet" (create a new wallet).
Biometric Wallet
- Press and hold the power button on the right side of the device for 3 seconds or more, then select a language.
-
Select "Create Wallet". A wallet is created with a brand-new key.
.png)
Biometric Wallet "Create Wallet" selection screen -
Register a PIN (4–8 digits) and enter it once more.
- Register your fingerprint. Touch the sensor about 8 times, shifting the position of the same finger slightly each time.
-
The device screen shows the 24 recovery words, 4 words per screen across 6 screens. Write them on the recovery card in order.
.png)
Recovery phrase display screen -
The device verifies the 24 words one by one. Enter the first 3 letters of each word and pick it from the list.
- When the wallet creation complete screen appears, you are done.
Detailed steps: Biometric Wallet Initial Setup
DCENT X
- Power on the device, select a language, then scan the QR code on the device screen with the DCENT app to connect and complete genuine device verification.
-
On the "Get started with DCENT X" screen, tap "Create New Wallet".
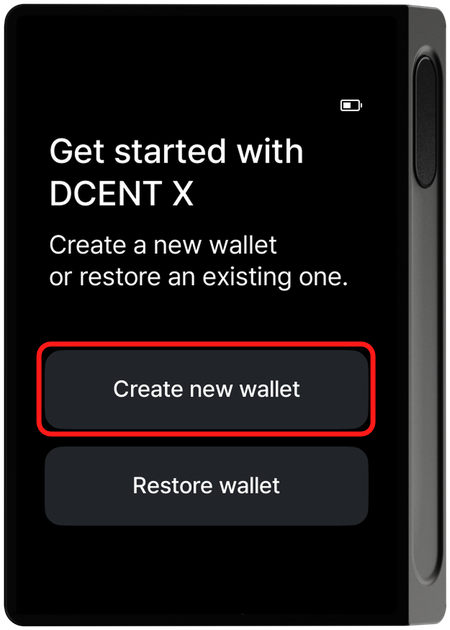
DCENT X "Create New Wallet" selection screen -
Set a PIN (4–8 digits) and enter it once more to confirm.
- Register your fingerprint. You can register up to 2 fingerprints.
- Confirm the guide screens and the new wallet is created.
- Tap the Recovery Card (R3covery Card) on the back of the device, set a 6-digit Recovery Card PIN, then tap the card once more to complete the backup.
-
On the mnemonic display prompt, select "View now" and write the 24 recovery words on the recovery card in order. They are shown only once.
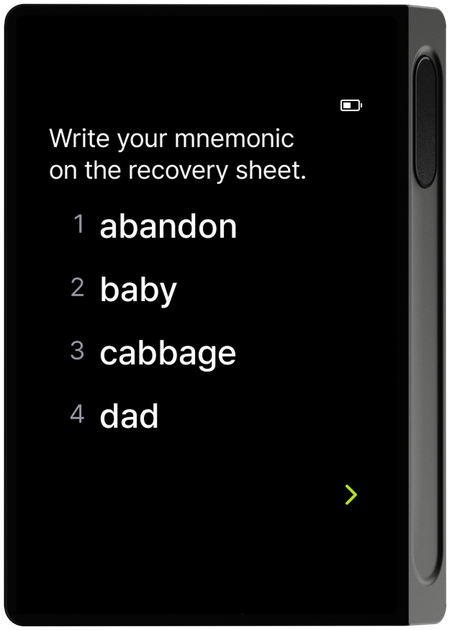
DCENT X recovery phrase display screen -
On the verification screen, pick the words in the correct order. When the "DCENT X setup complete" screen appears, you are done.
Detailed steps: DCENT X Initial Setup
DCENT S Card
The DCENT S Card has no screen, so the wallet is created in the DCENT app. The random seed behind the recovery phrase is generated by the secure chip inside the card.
- Turn on NFC on your phone. NFC is on by default on iOS; on Android, enable "NFC tag read/write" in Settings.
-
If you are launching the DCENT app for the first time, select "Card Wallet" in the wallet mode selection. If you are already using the App Wallet, add the wallet from the "Manage All Wallets" menu.
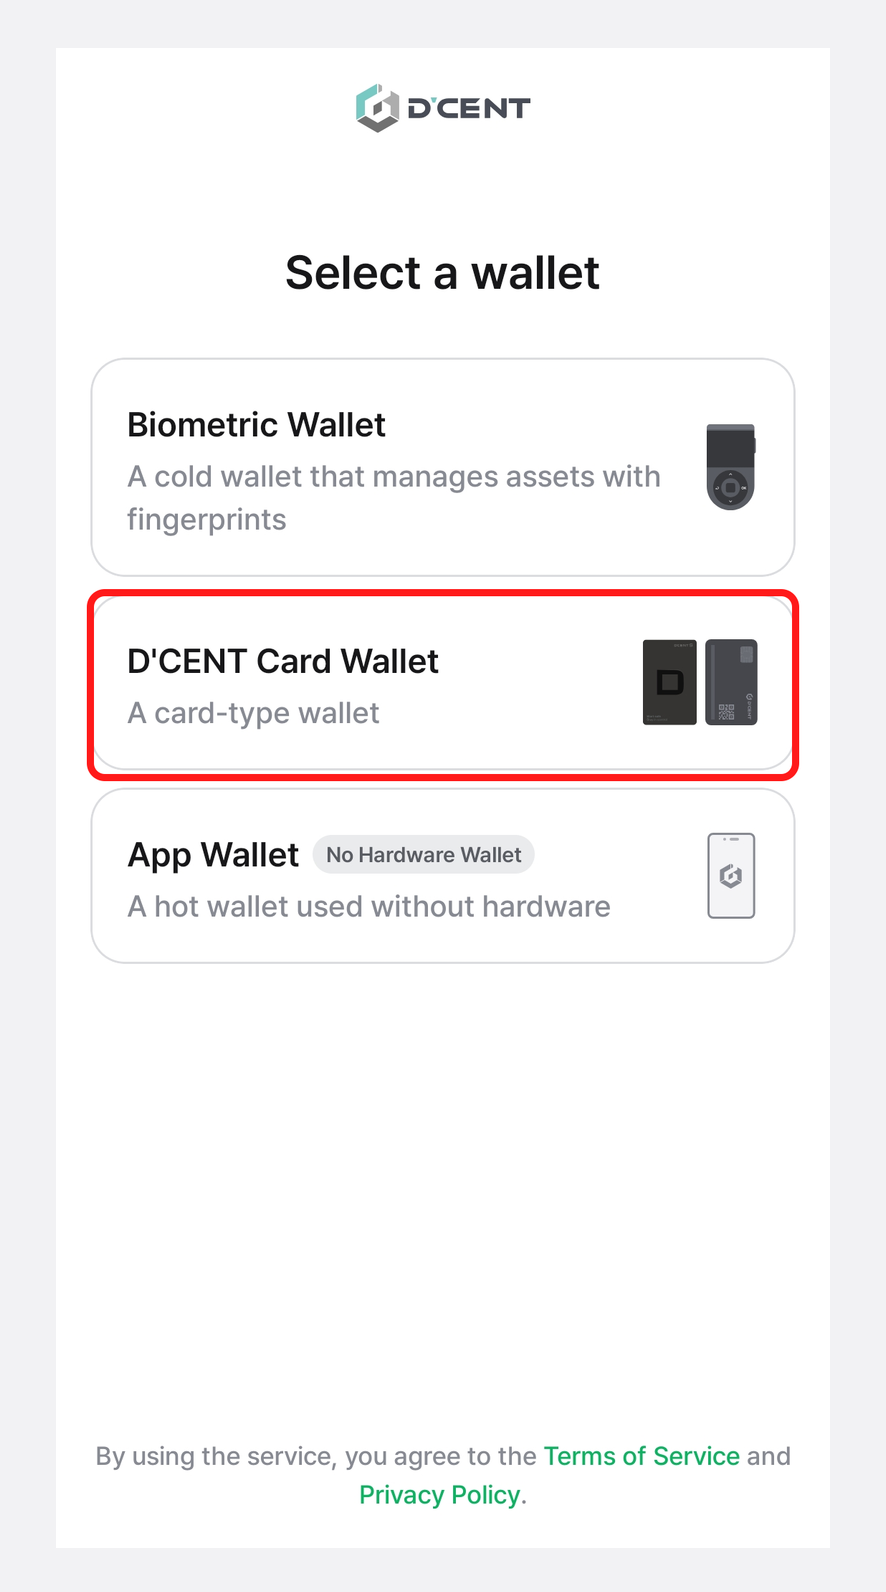
Wallet mode selection screen -
Follow the on-screen guide to tap the card on the back of your phone. Once the card is recognized, tap "Create New Card". This is not the recovery menu. NFC antenna positions differ by phone model, so move the card slowly to find it, and temporarily remove thick cases or metal accessories such as MagSafe attachments.
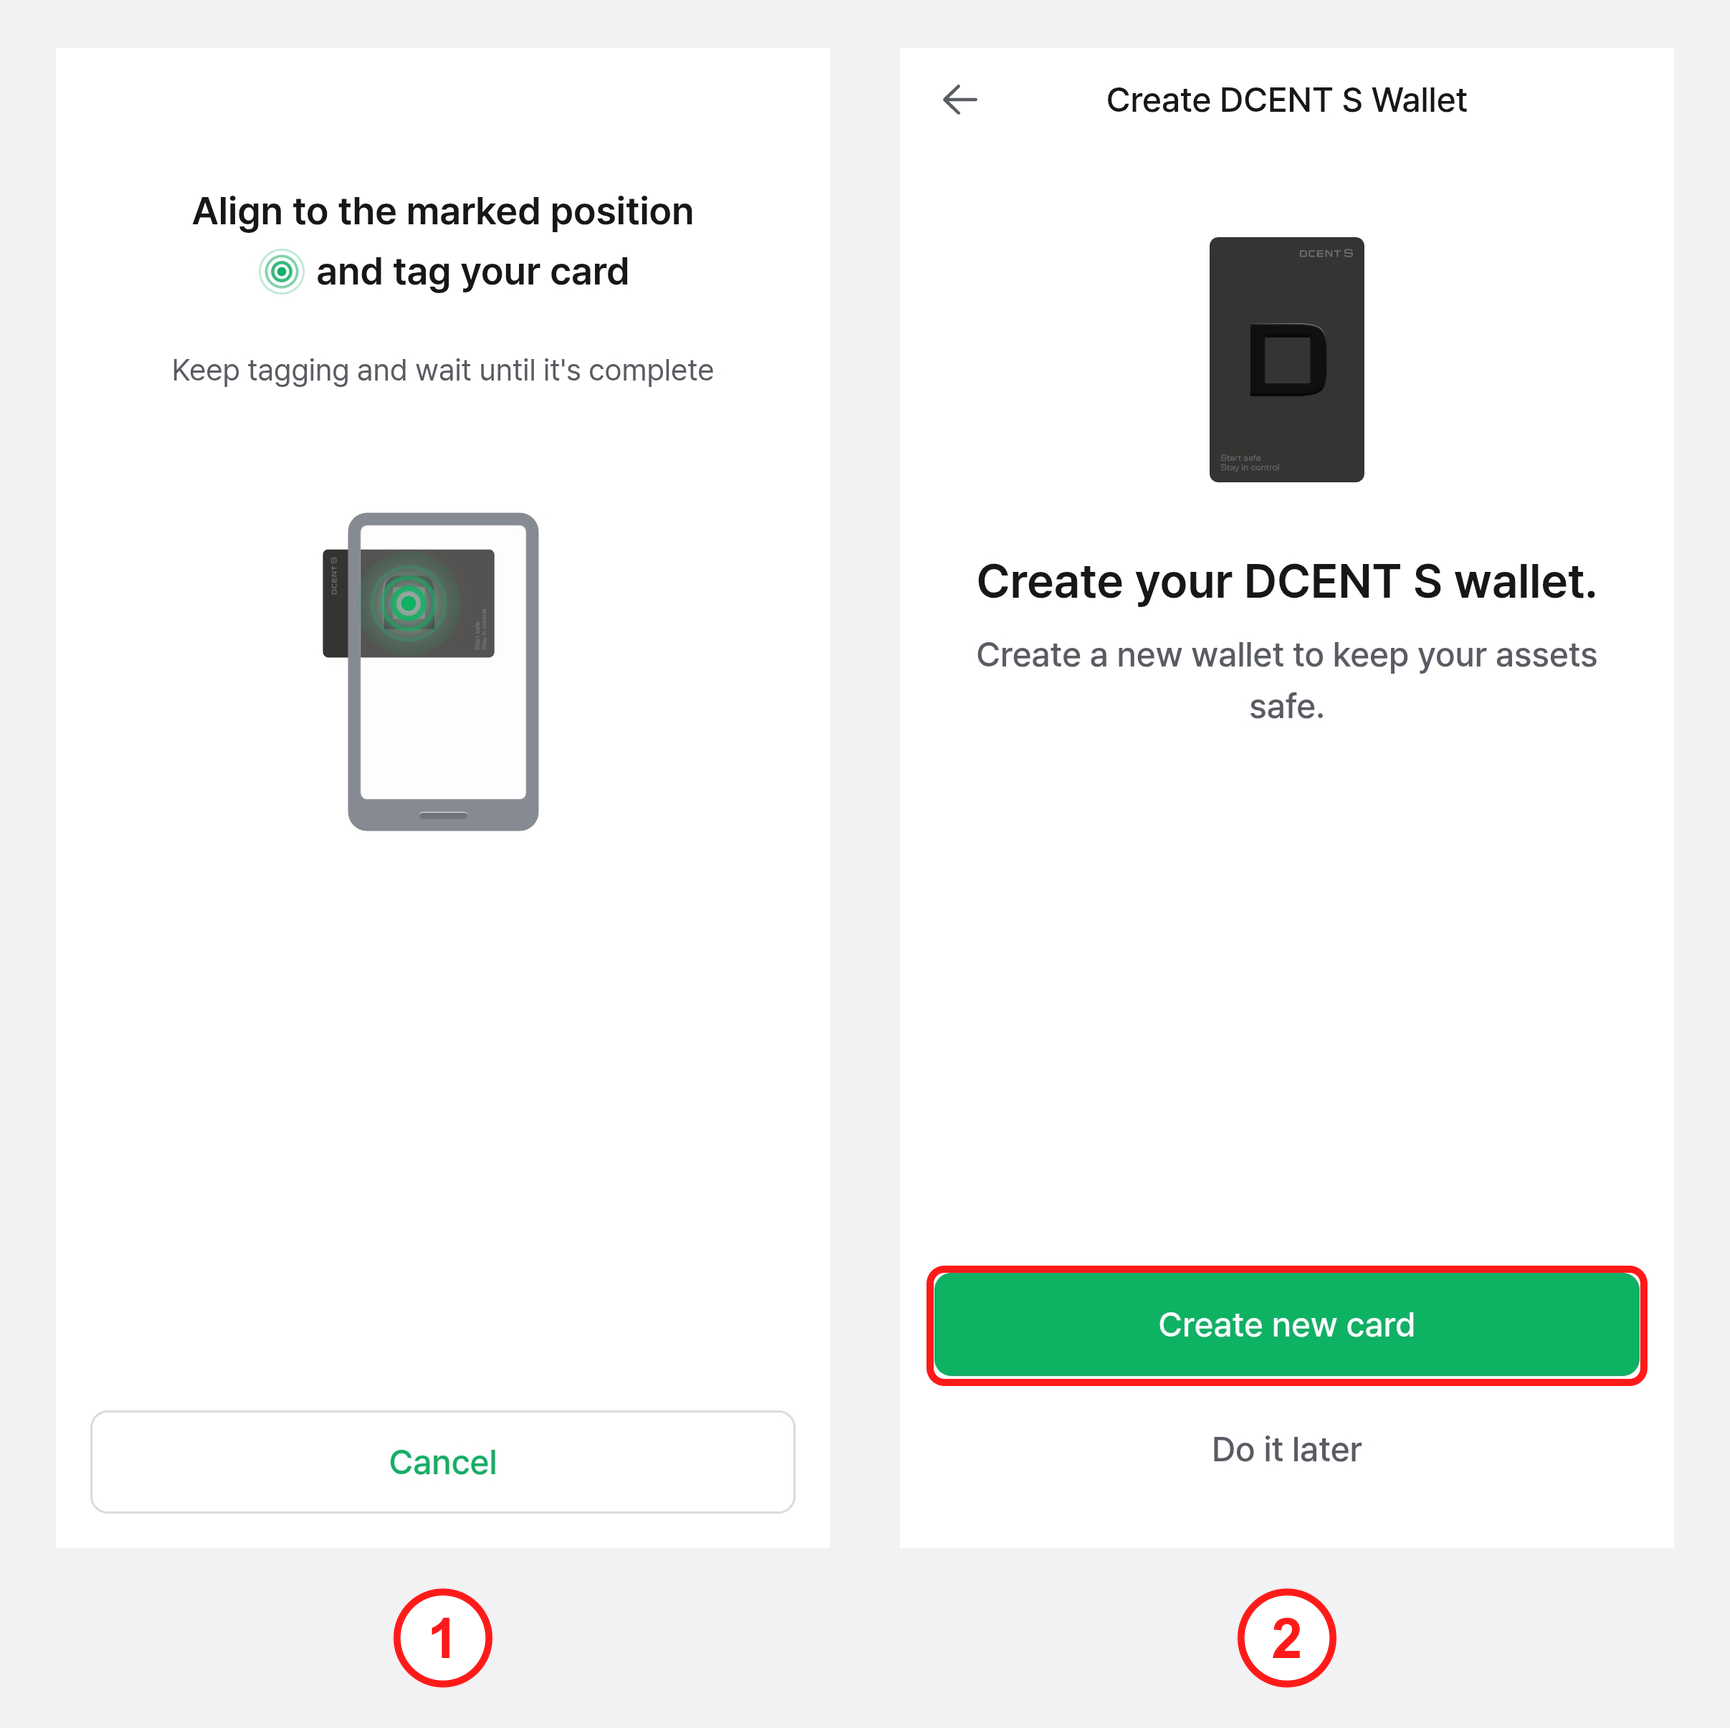
Card scan and "Create New Card" screen -
Tap "Create PIN", enter a 6-digit card PIN, confirm it once more, then tap the card again to save it. Entering the wrong PIN 10 times or more resets the card, so be sure to remember it.
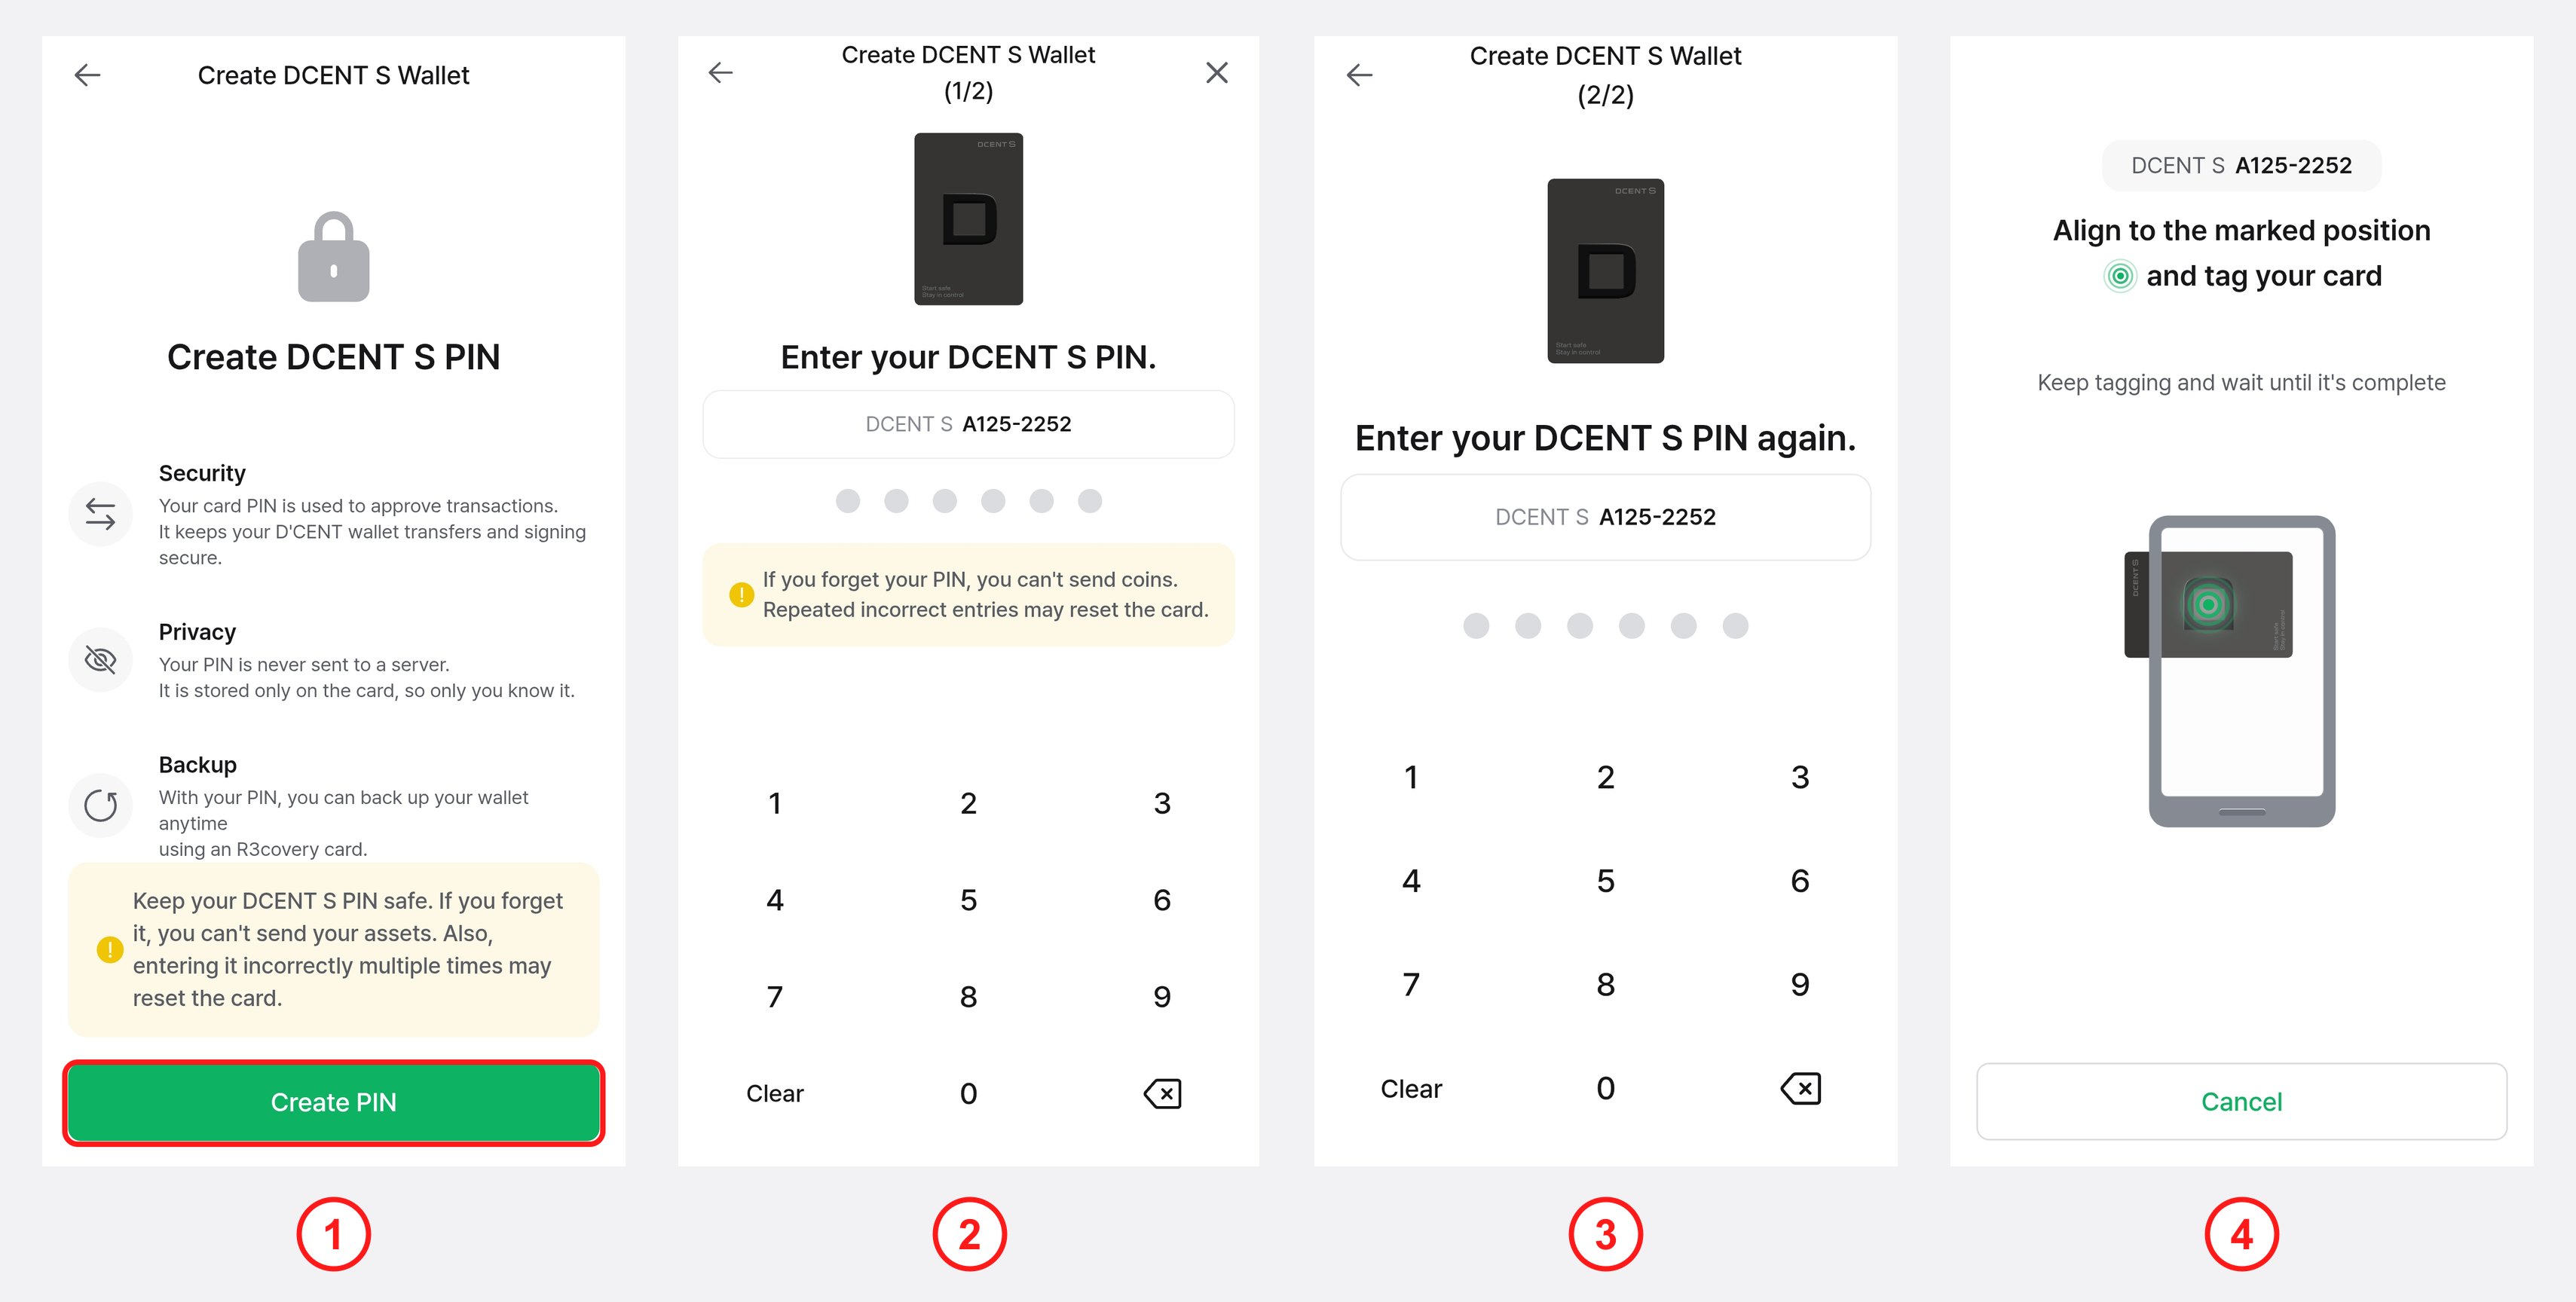
Card PIN setup screen -
Tap "Back up" to back up to the included Recovery Card (R3covery Card). The sequence is: tap the Recovery Card → enter the DCENT S PIN → tap the DCENT S Card → set a 6-digit Recovery Card PIN → tap the Recovery Card.
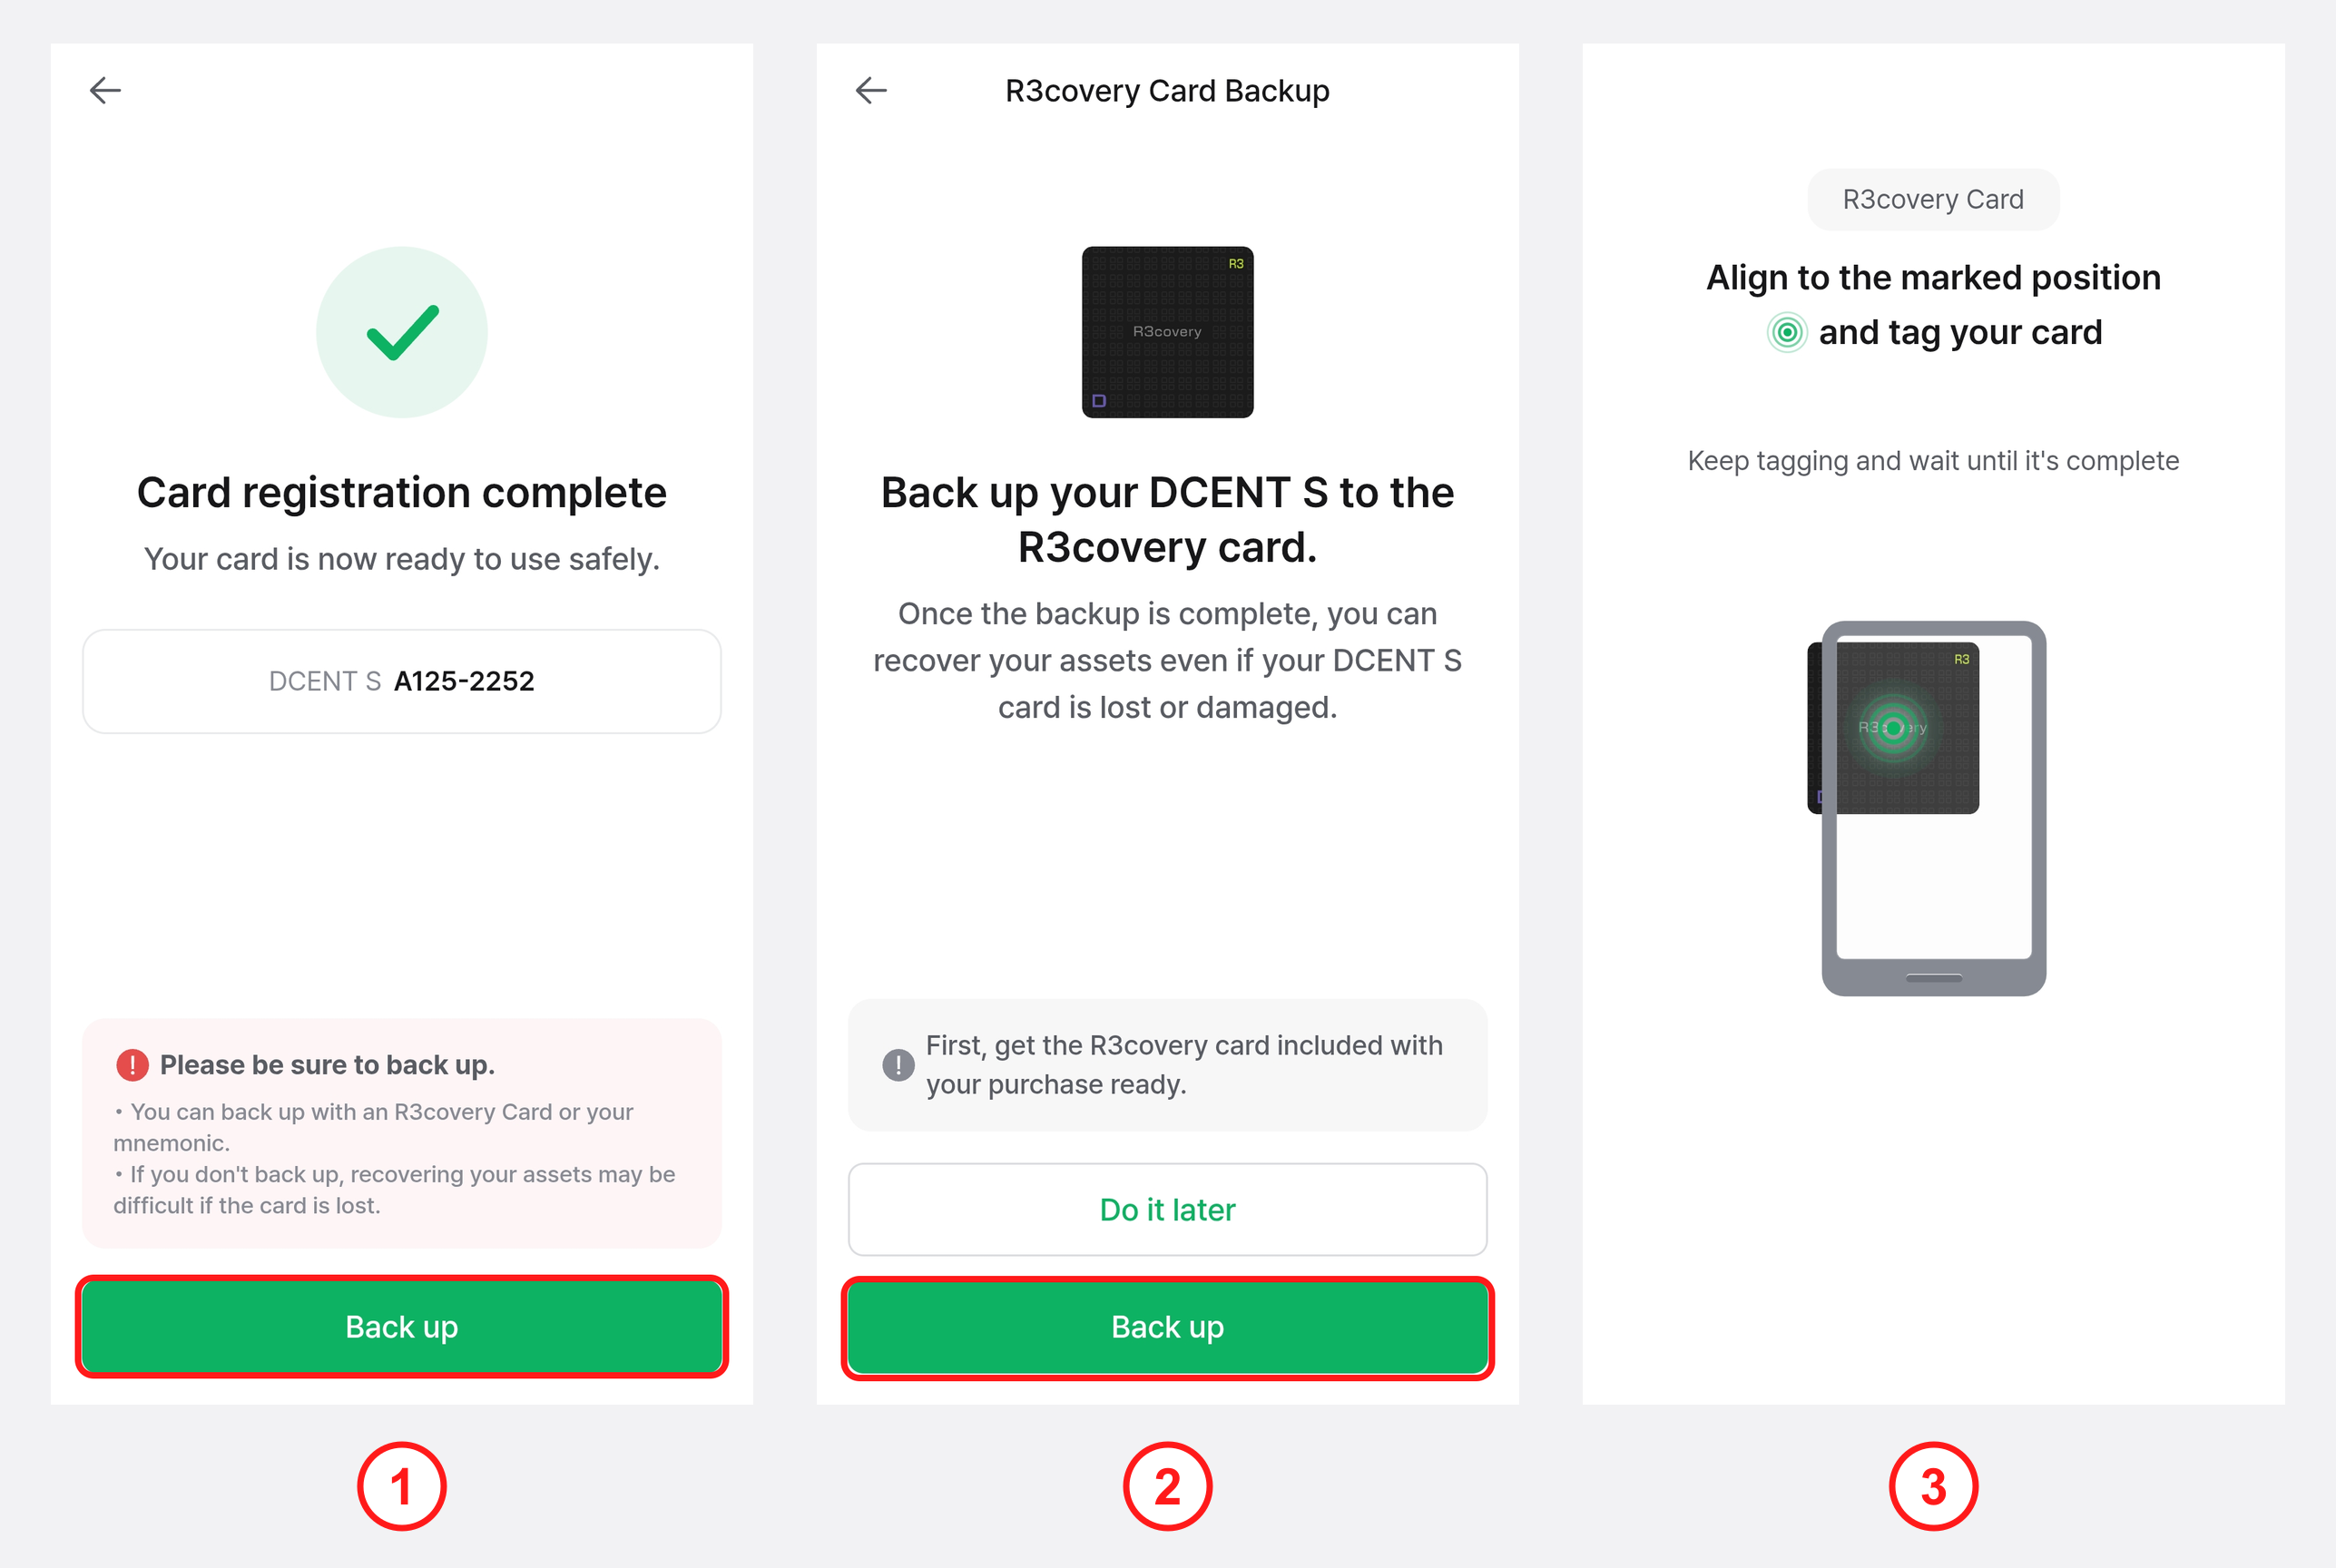
Recovery Card backup screen -
On the registration complete screen, tap "Would you also like to write down the mnemonic code on paper?" to view the 24 recovery words and write them on the recovery card in order. They are shown only once and cannot be viewed again. This is your last means of recovery if you lose both the Recovery Card and its PIN, so be sure to record it.
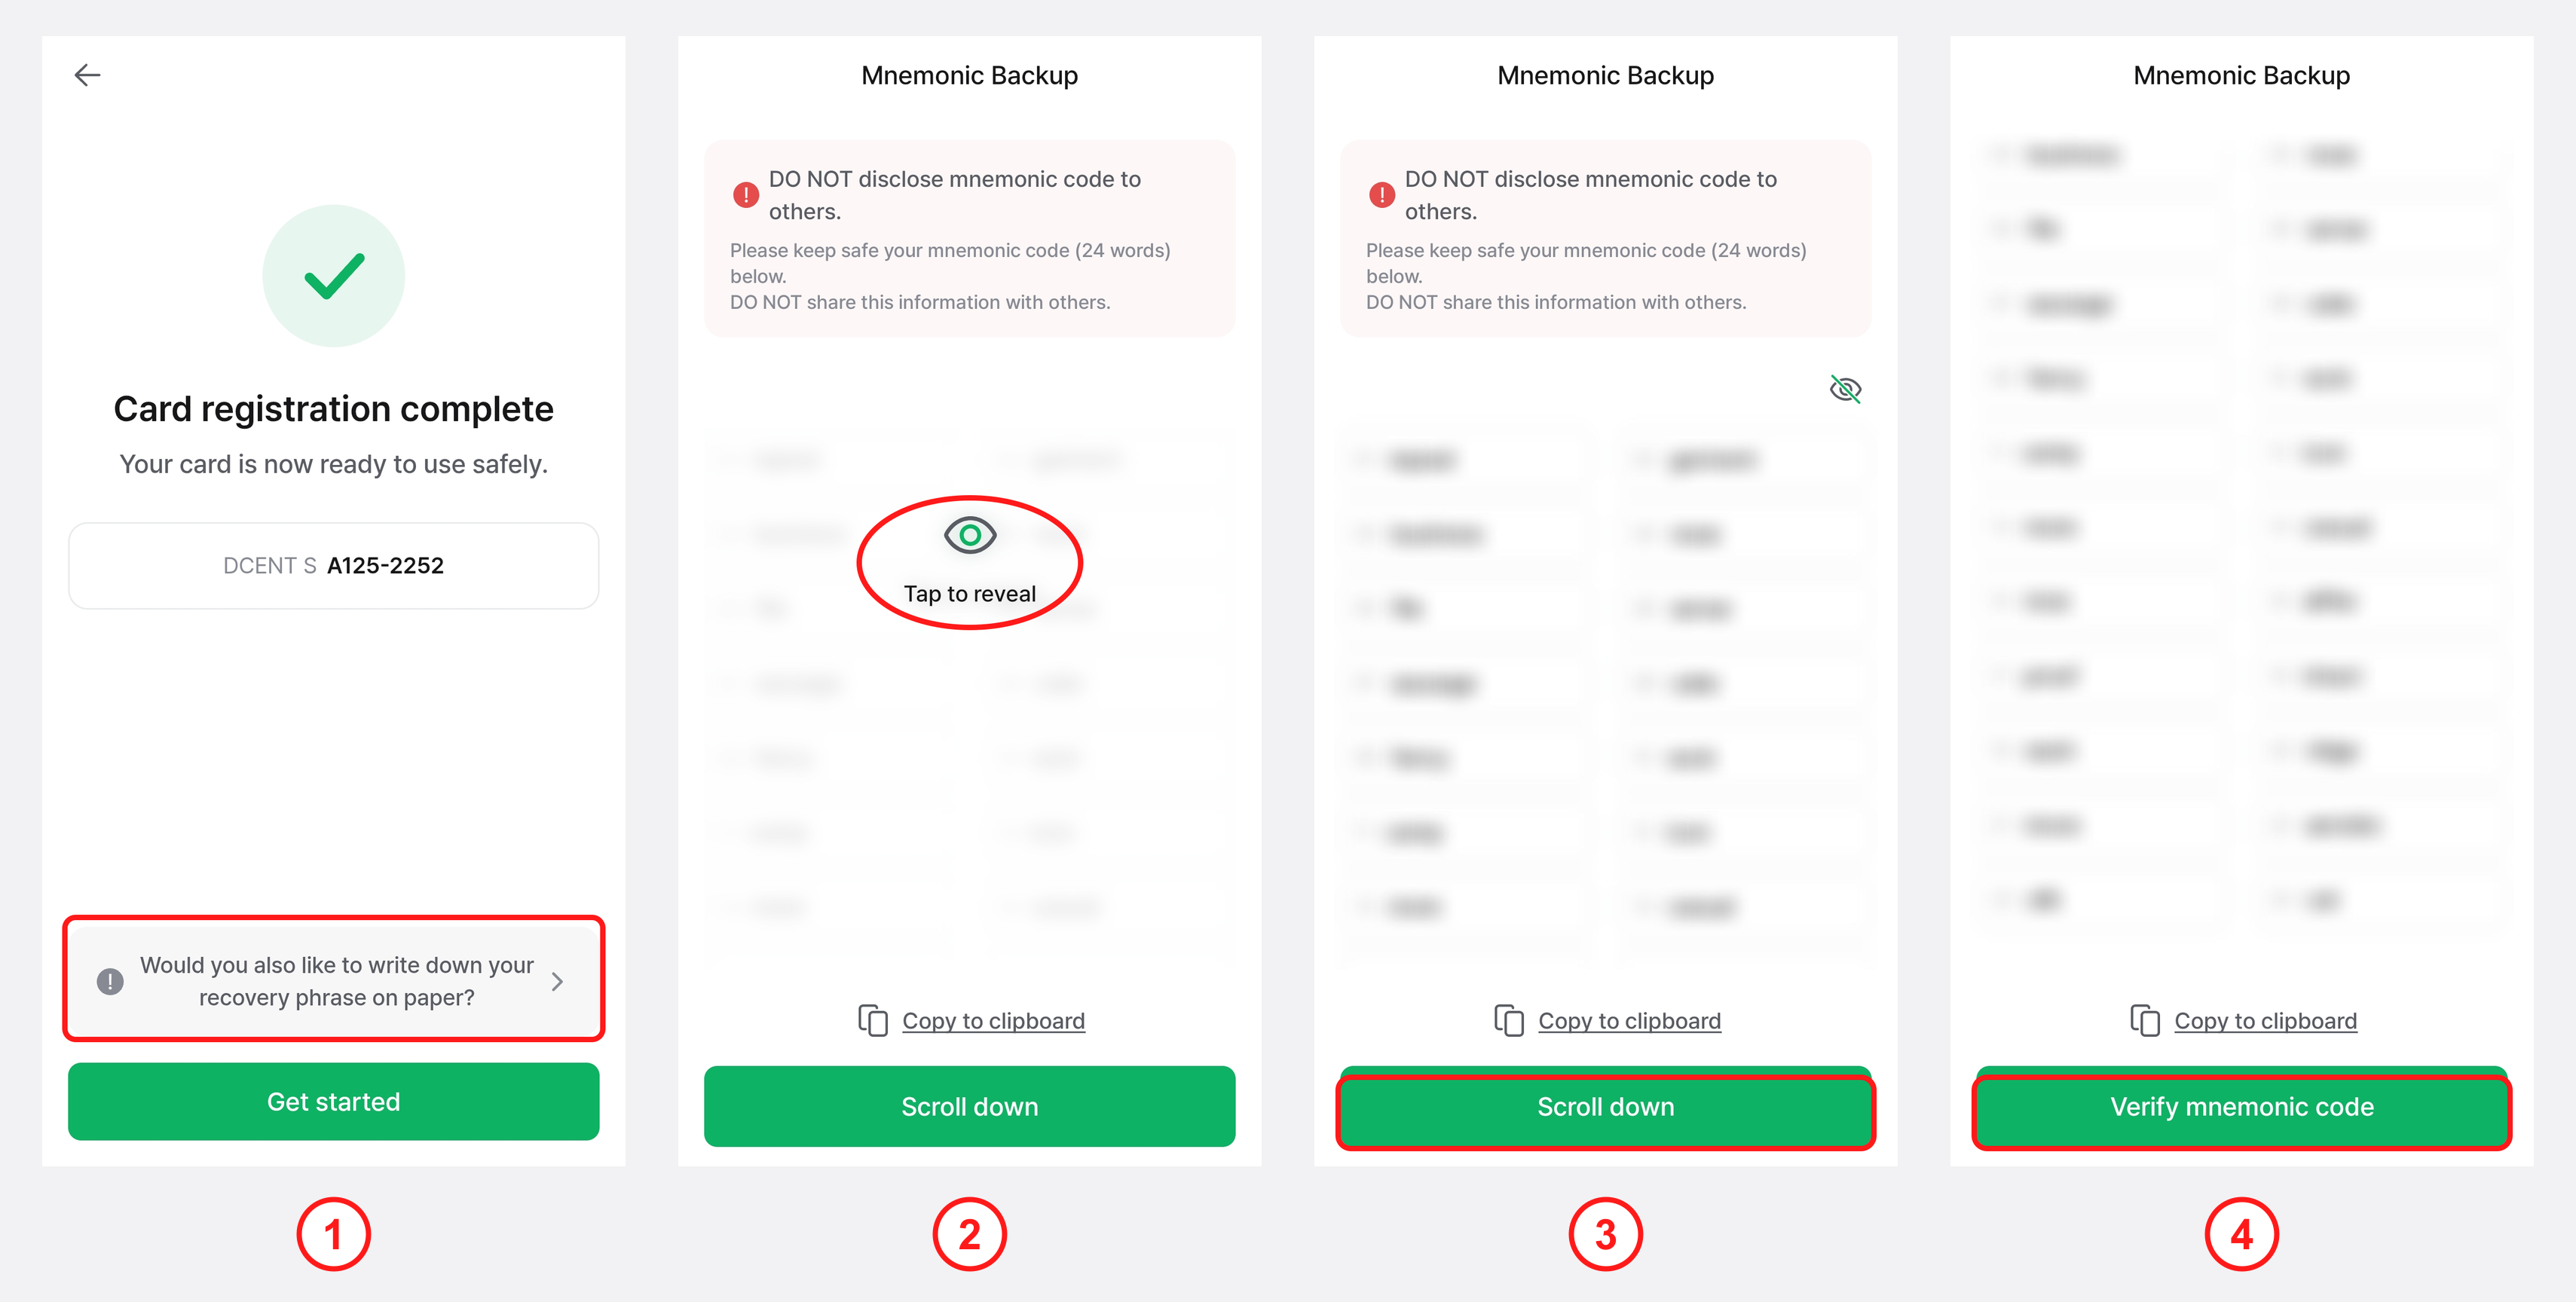
Recovery phrase verification screen -
Tap "Verify", select the words in the order you wrote them, then tap "Done" and "Get started".
Detailed steps: Set Up Your DCENT S Card Wallet
If you were already using a hardware wallet with the App Wallet's recovery phrase
That hardware wallet shares the same wallet key as the App Wallet. Proceed in this order.
- First move the assets on the hardware wallet elsewhere, such as an exchange. (See Method B.)
- Confirm that every balance on the hardware wallet is 0. Check tokens and NFTs as well.
- Reset the device. The menu for each product is as follows.
- Biometric Wallet: In the device's Settings menu, select "Device Reset". Enter your PIN, read the warning, and press "OK". The device powers off and starts in factory-reset state when turned back on. View guide
- DCENT X: In the device's Settings > System, select "Device Reset". Enter your PIN, confirm the warning, and tap the reset button. The device restarts and initial setup begins again from language selection. If you did not view the recovery phrase during initial setup, a screen asking whether to view it appears first. View guide
- DCENT S Card: In the DCENT app's "Manage All Wallets", tap the more (⋮) button next to the card and select "Card Factory Reset". Check both confirmation items, tap "Reset Card", enter the card PIN, and tap the card to finish. A reset card is also removed from the app. View guide
- Create a new wallet with "Create Wallet" following the steps above.
- Move your assets to the new addresses.
Caution. Resetting erases the wallet key inside the device. Never reset while assets remain on the wallet.
Step 2. Back up the recovery phrase
The new recovery phrase (mnemonic) is the only way to restore this wallet. DCENT does not keep your recovery phrase and cannot recover it for you if it is lost.
Do this.
- Write it by hand on the recovery card and double-check the order and spelling.
- Store it away from moisture and fire.
- If you have a Recovery Card (R3covery Card), back up by tapping it, and do not forget the card PIN.
Do not do this.
- Take photos or screenshots
- Save it to cloud storage, a notes app, email, or a messenger
- Send it to family via text message or chat apps
- Enter it into any website or app that asks for your recovery phrase
Caution. If you store the recovery phrase digitally, anyone who can view that file can move your assets.
Step 3. Connect to the DCENT app and update firmware
- Open the wallet selection screen in the DCENT app.
- Select the newly created hardware wallet. A wallet switch notice appears and the app restarts.
- If the app prompts for a firmware update, complete it before receiving assets. Without the latest firmware, some network accounts cannot be added.
- Biometric Wallet: On Android, you can update in the app by connecting an OTG cable. On iPhone, updates are available on a PC only. The PC needs the Chrome browser and a USB cable that supports data transfer.
- DCENT X: Update in the app. Keep the device connected to power and do not disconnect Bluetooth during the update. DCENT X Firmware Update
- DCENT S Card, All-in-One Card Wallet: No firmware update.
Switching wallets does not delete the App Wallet. You can switch back to the App Wallet to send assets, so do not worry.
Step 4. Add receiving accounts and verify the address
- With the hardware wallet selected, tap Add Account.
- Add an account on the same network as the asset you are moving. For example, to move USDT on the TRON network, add a TRON account. For tokens, add the account first, then add the token inside that account. See Create Account for details.
- In the My Wallet tab, tap the account and open Receive.
- Copy the address with the Copy button. Do not type it by hand.
Make it a habit to double-check the address on the device screen. Even if the address on your phone screen were tampered with, the address on the device screen is generated by the device itself.
- Biometric Wallet: On the device's main screen, select the coin account and press OK. Press once more to show the address, and again to show the QR code.
- DCENT X: Tap the account on the home screen to display the address.
- DCENT S Card, All-in-One Card Wallet: No screen. Double-check the address on the app's Receive screen and always perform the small test transfer described below.
When comparing addresses, check the first 6 characters, the last 6 characters, and part of the middle. Fake addresses that match only the beginning and end exist.
Caution. Do not pass the address through a messenger or notes app. Copying inside the DCENT app and pasting inside the DCENT app is the safest way.
Step 5. Send from the App Wallet
Follow "3. Common: Sending Order from the App Wallet" below.
2-B. Moving to an Exchange
Screens differ by exchange, so only the common procedure is described here. Please read your exchange's deposit instructions first.
- Open Deposit in the exchange app and select the coin to move.
- Check the network. Even tokens with the same name cannot be received if the network differs. If your App Wallet USDT is on the TRON network (TRC-20), select the TRON network on the exchange as well.
- Copy the deposit address. For XRP, a Destination Tag is shown; for some coins, a memo is shown. Copy that value too.
- Check the minimum deposit amount and the number of confirmations required.
- Check the exchange's travel rule or personal wallet registration requirements. Some exchanges limit or require registration for deposits from personal wallets above a certain amount. Follow the procedure your exchange provides.
- Send a small test amount first, then the rest, following "3. Common: Sending Order from the App Wallet" below.
Caution. If you omit the destination tag when sending XRP to an exchange, the exchange cannot tell whose deposit it is and you may lose the assets. Use the tag exactly as shown on the exchange's deposit screen.
Caution. The exchange manages the wallet key of an exchange wallet.

The image above is the Binance XRP deposit screen. After selecting the asset (XRP) and the network (XRP Ledger), the deposit address and the memo (destination tag) are displayed together. Both values must be copied. The address and memo in the example are blurred.
3. Common: Sending Order from the App Wallet
The key is small test transfer → confirm arrival → send the rest. Repeat this for every asset type.
- On the wallet selection screen of the DCENT app, switch to the App Wallet.
- In the My Wallet tab, tap the account of the asset to send and select Send.
-
Paste the receiving address or enter it via QR scan, verify that the address is correct, then tap "Next". If you are sending XRP to an exchange, enter the tag provided by the exchange in the Destination Tag field. Leave it empty when sending to a hardware wallet. If a pop-up says no tag was entered, you are sending to a personal wallet, so tap confirm and proceed.
.png)
Receiving address input screen -
Enter a small amount. About 1–5% of the total is enough. You can enter the amount in local currency instead of the coin amount. For XRP, observe the minimum amount described in the chain-specific notes below.
-
If the coin allows a fee selection, choose the network fee. Among Slow / Normal / Fast, Normal or higher is recommended. Once the amount and fee are set, tap "Next".
.png)
Amount and fee input screen -
Review the transaction details shown on the screen, tap "Send", and enter the 6-digit password you registered when first setting up the app. If you have set up additional authentication, you can use your fingerprint or Face ID.
.png)
App Wallet final approval screen -
Confirm arrival on the receiving side.
- Hardware wallet: Switch to the hardware wallet in wallet selection and check the balance.
- Exchange: Check the deposit history.
- Once arrival is confirmed, switch back to the App Wallet and send the rest. Tapping the Max button fills in the maximum sendable amount after deducting fees and any required reserve.
Detailed steps: Send from the App Wallet
Sending order. If you hold both a coin and tokens on the same network, send the tokens first and the network coin last. For example, send ERC-20 tokens (USDT, USDC, etc.) before ETH, TRC-20 tokens before TRX, and XRP trustline tokens before XRP. The network coin is used to pay the fee when sending tokens, so if you send all of the coin first, the tokens cannot be moved.
Tip to reduce wallet switching. If you hold several asset types, send all the small test transfers first. Then switch wallets only once to confirm all arrivals at the same time. Each wallet switch restarts the app and requires reconnecting the device.
4. Chain-Specific Notes
For all chains: tokens first, network coin last
If tokens and the coin are on the same network, move the tokens first and the network coin last. The network coin pays the fee when sending tokens, so sending all of the coin first leaves the tokens stuck.
| Network | Move first (tokens) | Move last (coin) |
|---|---|---|
| Ethereum-compatible | ERC-20 tokens (USDT, USDC, etc.) | ETH, POL, BNB, KAIA, etc. |
| TRON | TRC-20 tokens (USDT, etc.) | TRX |
| XRP Ledger | Trustline tokens | XRP |
XRP
- Move trustline tokens first and send XRP last. Remaining trustlines require a larger reserve.
- The full balance cannot be sent. An XRP account must always keep the minimum reserve set by the network. The app only lets you send the amount minus the reserve. The remaining reserve is normal, not an error.
- A first-time receiving address needs an activation amount. When sending to the XRP address of a newly created hardware wallet for the first time, you must send 1 XRP or more. Sending less will fail. Make your test transfer 1 XRP or more as well.
- A destination tag is mandatory when sending to an exchange. It is not needed when sending to a hardware wallet.
Ethereum-compatible networks (Ethereum, Polygon, BNB Chain, Kaia, Arbitrum, Base, etc.)
- Move ERC-20 tokens (USDT, USDC, etc.) first and send the network coin (ETH, POL, BNB, KAIA, etc.) last.
- Sending tokens requires the network's coin for fees. ERC-20 tokens need ETH, Polygon tokens need POL, and Kaia tokens need KAIA. If insufficient, the app shows "Insufficient network fee".
- Clean up contract approvals (approve). Contracts you approved to spend tokens while using dApps may still exist. Those approvals become a risk if tokens ever flow back into the App Wallet address. You can revoke remaining approvals in the Approval tab of the DCENT app. Revoking also requires a small amount of the fee coin. If you do not plan to use the App Wallet address again, simply never sending anything to that address is sufficient.
- If the App Wallet address is saved in the withdrawal address book of an exchange or other service, delete it or replace it with the new address to avoid accidentally sending to the old address.
- Kaia now creates accounts the same way as Ethereum. Assets in accounts created the old way appear separately under the Kaia Legacy account. Check which account holds the assets you want to move.
TRON (TRX, USDT TRC-20)
- Move TRC-20 tokens (USDT, etc.) first and send TRX last.
- Sending USDT (TRC-20) requires TRX. TRON uses resources called energy and bandwidth for transfers, and TRX is deducted for any shortfall. Without TRX, the app shows "Insufficient network fee (TRX)" and the transfer cannot be sent.
- To a newly created hardware wallet TRON address, we recommend sending a small amount of TRX first, then USDT.
Bitcoin, Litecoin
- Confirmation time varies with the fee level. Choosing Slow can take several hours or more when the network is busy. Since this is an urgent move, Normal or higher is recommended.
- Bitcoin supports raising the fee after sending (RBF), but Litecoin does not. Set a sufficient fee for Litecoin from the start.
- Very small amounts smaller than the fee cannot be sent. A small leftover is normal.
- If you have multiple Bitcoin accounts (Legacy, SegWit, Taproot), each must be moved separately.
VeChain (VET)
- Fees for sending VET are paid in VTHO, not VET. Without VTHO, VET cannot be moved. If VTHO is insufficient, obtain some from an exchange, deposit it into the App Wallet's VeChain account, then send.
Staking and DeFi deposits
- The DCENT app shows deposit status but does not unstake or withdraw for you. Go to the service (dApp) where you deposited, unstake first, and move the assets once they return to the App Wallet.
- Some services take several days to release. Start the release first and move your other assets in the meantime.
- Since connecting to the dApp requires the App Wallet, do not remove the App Wallet until the release is complete.
Other networks
- On Solana, sending a token to a new address for the first time costs a little extra SOL to create the token account. The app calculates this automatically.
- The same principles apply to all other networks: add an account on the same network, secure the fee coin, and send a small test transfer first.
5. Beware of Impersonation and Phishing
- DCENT never asks for your recovery phrase or private key.
- DCENT never asks you to send assets to a specific wallet address for asset recovery or compensation.
- Any "we can help recover your assets" or "apply for compensation" message received via DM, email, or social media comments is a scam.
- Check announcements on official channels only. For questions, please contact DCENT Support.
6. Frequently Asked Questions
Q. Recovering the hardware wallet with the App Wallet's recovery phrase is free and convenient. Why not?
The same recovery phrase means the same wallet key. If the phrase has been exposed, an attacker still holds the same key even after you load it into a hardware wallet. Even with the cost of fees, you must move to a new key.
Q. I only use a hardware wallet. What should I do?
If you have never entered your hardware wallet's recovery phrase into the DCENT App Wallet, no action is required.
Q. I do not have a hardware wallet yet.
Move your assets to an exchange you already use. DCENT hardware wallets are available at the DCENT official store.
Q. I have only one hardware wallet, and it also needs to be moved.
Move the assets to an exchange or another trusted wallet first, reset the device, create a wallet with a new recovery phrase, and move the assets back. (See the last item of Method A, Step 1.)
Q. I sent the assets but they do not appear on the hardware wallet.
Check that an account on the same network has been added on the receiving side. Tokens may not appear until you add the token inside that network's account. For Kaia, also check whether it is a Legacy account. If the transaction status is still pending, wait for confirmation.
Q. I get "Insufficient network fee".
It is the network's coin, not the token, that is insufficient. Top up a small amount of ETH, POL, KAIA, TRX, etc., and try again. If you need to buy it on an exchange and send it to the App Wallet, send only as much as needed for fees. Do this only after updating the app.
Q. Not all of my XRP was sent and some remains.
That is the reserve required to keep the XRP account. It is normal, and the app automatically leaves that amount.
Q. I sent XRP to an exchange but forgot the destination tag.
Contact the exchange's customer support with the transaction details (transaction ID). DCENT cannot request internal processing on the exchange's behalf.
Q. My USDT (TRC-20) transfer fails.
In most cases, TRX is insufficient. Top up a small amount of TRX and try again.
Q. My App Wallet assets disappeared while I was moving them.
Check the transaction history for withdrawals you did not make, and send your wallet address and transaction history to DCENT Support.
Q. Is a hardware wallet completely safe now?
It differs from the App Wallet in that the wallet key never leaves the device. However, do not photograph the new recovery phrase or store it online, or the same risk returns. Security is complete only when the recovery phrase is managed properly.
Q. Should I delete the DCENT app?
No. Do not delete the app; update it to the latest version and keep using it. The app is needed to connect your hardware wallet and to receive further notices. Just do not keep assets in the App Wallet.
Closing
When moving your assets, please be sure to observe the following three points.
- Proceed by transfer, not recovery. Do not enter the App Wallet's recovery phrase (mnemonic) into a hardware wallet.
- Send a small test transfer, confirm arrival, then send the remaining amount.
- Sending tokens requires the network's fee coin, and a destination tag must be entered when sending XRP to an exchange.
Observing these points will help you avoid most of the mistakes that can occur during the transfer. For the latest updates, please refer to the official X post.
👉 Go to the DCENT official user guide
This article is provided for educational purposes only. All information is for reference and should not be considered investment, legal, or tax advice.
If you get stuck at any step, please send us your wallet address and the transaction details (transaction ID).